Logging HomeKit data to Google Sheets for free: walkthrough
Logging HomeKit data to Google Sheets for free: walkthrough
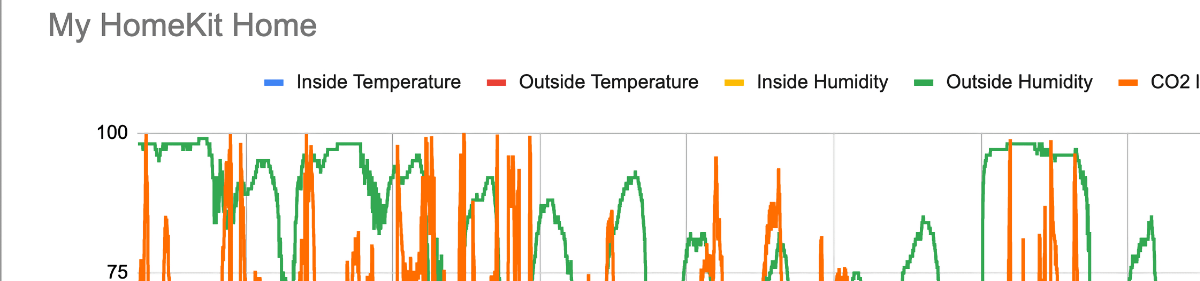
My home is smart! My home is smart enough to switch off the lights when I’m not there (and then switch them on for a couple of hours each night to avoid break-ins). My home is smart enough to warn me if the front door is left open, or when I should open the window because the level of CO2 is getting too high. However, my home also is very forgetful…
The centre of my home is Apple HomeKit (a long, often religious, discussion may follow on why – and also on why I use VIM rather than Emacs…. but I’m leaving that for the comments; or /dev/null), but this is the way it is.
The “brains” of Apple HomeKit can either be your iPhone/iPad when you are (or actually, when they are) at home; however if you want your home to remain smart when you take your devices, you should have a home hub (this can be either a HomePod, HomePod mini, Apple TV or iPad (one you leave at home all the time).
These brains are good at doing stuff (if the CO2 level goes over 800, switch the ventilation to a higher setting), but (for reasons beyond a mortal’s understanding) apple does not provide a way to check historical data, log data over time, etc.
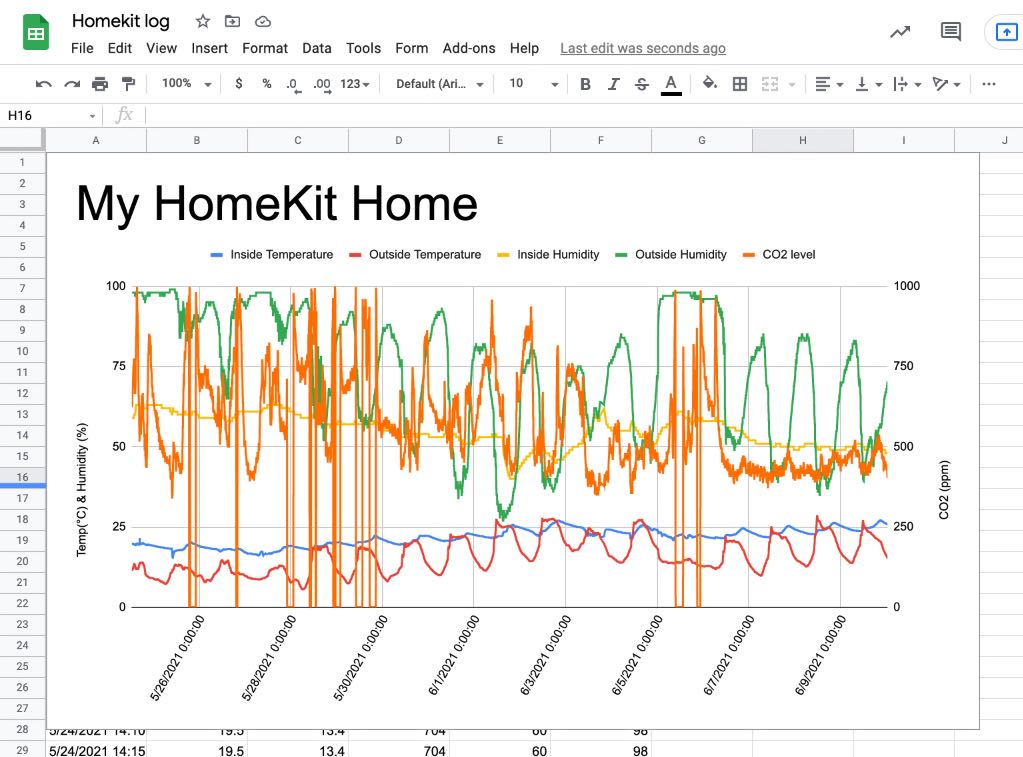
It is possible however, with a bit of creativity, to periodically log the data from your HomeKit devices. Personally I decided to log this to a Google Sheet, giving me an ideal location to create graphs from this data (and for free). In this article I will describe that way, however it should be easy to skip the Google Sheet steps and log your data elsewhere.
This post assumes that you have a home hub setup to run your logging while you’re away (meaning an Apple TV, HomePod or iPad that functions as home hub); this will be all the hardware that we need for this.
Failed attempts
Raspberry Pi
My initial idea was to get a Raspberry Pi, have it somehow join the HomeKit network (whatever that is), and then just read and log the data every couple of minutes. The problem is that there is no 3rd party HomeKit API for reading. It is possible to create something that acts as a HomeKit device (e.g. you create your own smart light, and then have HomeKit recognise it and integrate it into your HomeKit home), however such a device can only send data (and receive commands). It can not read data from other HomeKit devices. Even though this makes sense (HomeKit data may be privacy sensitive (especially if you have HomeKit cameras); I don’t want every HomeKit device to have access to all data of all other devices), it does mean that creating something that will log the data, will not work. There is just no HomeKit API for this.
iPhone app that logs in the background
A second idea was to see if I could build an iPhone app to do this. iPhone apps after all can get permission to read HomeKit data, so doing this and logging this shouldn’t be too hard. HomeKit data is available even when you’re not at home, so the app could run 24/7, only having occasional gaps when the phone has no internet at all.
Unfortunately (for this plan, probably good for your privacy), iOS apps can only read HomeKit data when they run in the foreground. This means that it will not be possible to run this on your iPhone or iPad, unless you have a spare device lying around that can run this app 24/7 in the foreground. Even though I could imagine a nice Home Hub app on an iPad that you hang on your wall could work (and then could include this logging), it’s probably not something that most of us want to invest in.
Solution
It turns out that you can set up HomeKit automations, which get run on the home hub (i.e. your HomePod or Apple TV), which can do the work for you. Setting them up is a bit convoluted; especially if you have many devices you want to log. However once it’s setup, it seems to run quite stably.
Setup Google Sheets
Before we can start logging data, we need to make sure we have a place to store the data. This article uses Google Sheets, because it’s free, it’s well known (and probably will be around for a while), and it can receive our data without too much effort. If you want to use something else than Google Sheets, it shouldn’t be too hard to set it up; anything that can accept HTTPS posts of data will do.
In this section, we will:
- Create a Google Form with a single question for each metric that we want to log
- Set the form to accept anonymous submissions
- Find out the post URL and the field names that Google uses in this form
- Connect the form to a Google Sheet
- Test if we can post from the commandline to this Google Sheet
In order to get a Google Sheet to accept HTTPS posts, we create a form in front of it. There are other methods to allow HTTPS posts to Google Sheets (through Google Cloud for instance), but creating a form is by far the easiest.
- Before you start, you should make sure you have a Google/Gmail account; if you don’t, create one now.
- Now in order to set up our Google Sheet, we (counterintuatively) must create a new Google Form <– open this link in a new window and log in with your Google account.
- Start a new form (from the Blank template), and name it
Homekit Logger(this is optional; you can also do this later or leave it unnamed). - Change the type of the first question to “short answer” and where it says “Untitled Question”, fill in the name of first metric you want to measure (e.g. “outside temperature”).
- Now click the “duplicate” button on the question, and name the second question to the second metric (e.g. “outside humidity”)
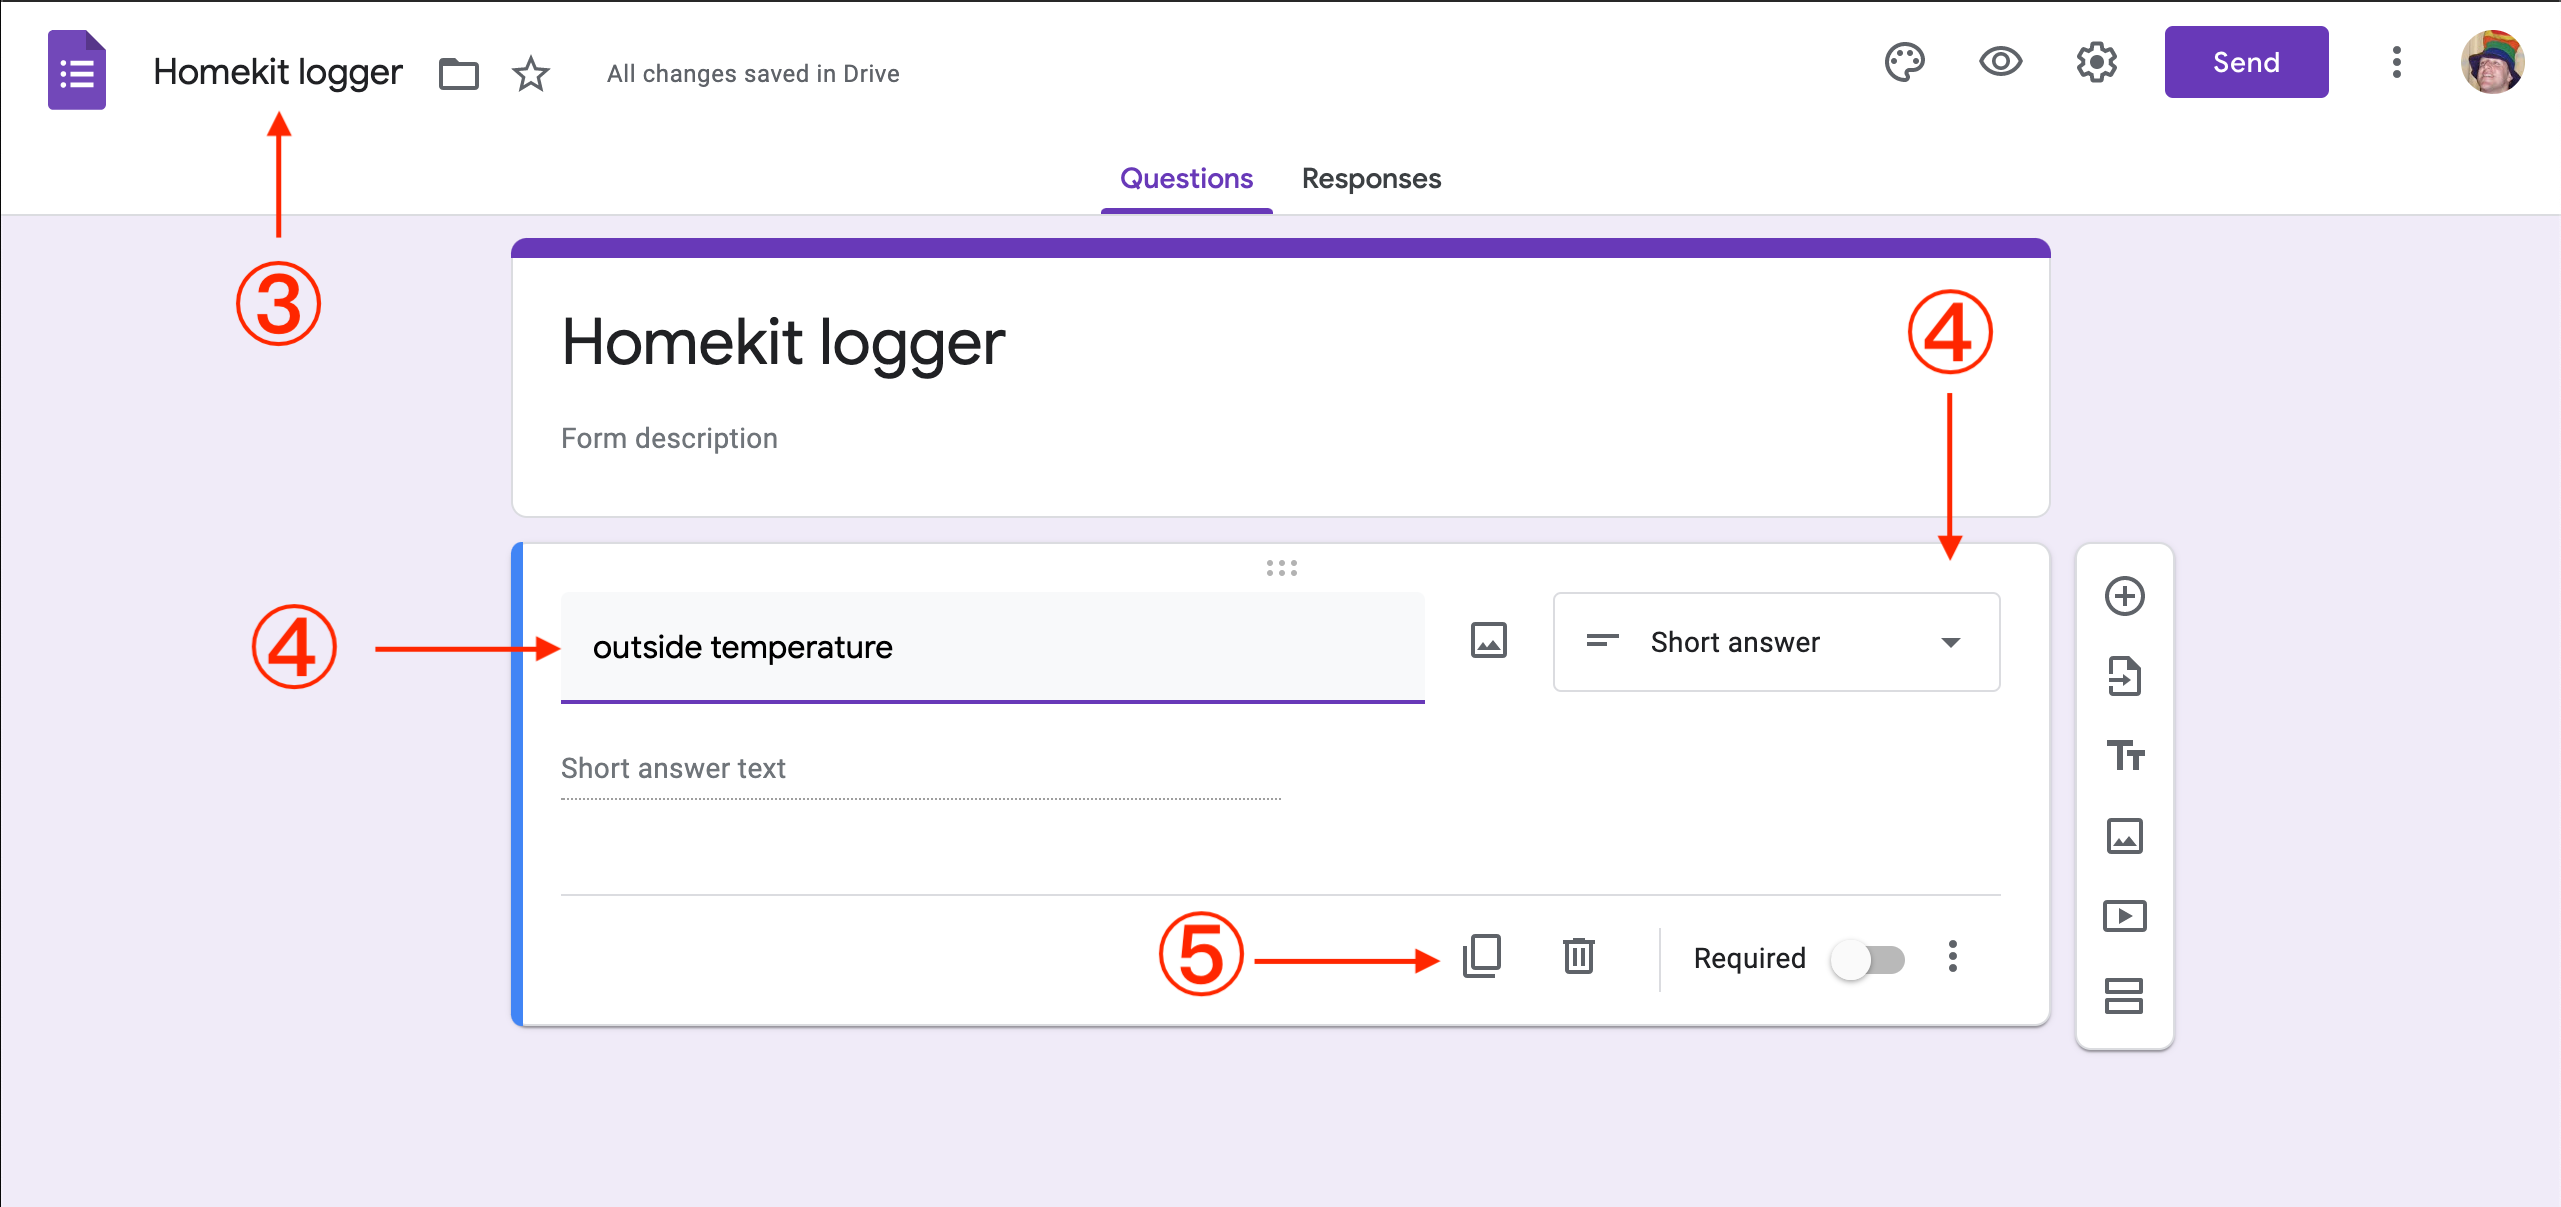
Screenshot of form create page - Keep repeating the last step, until you have 1 question for each metric.
- Once you have all the metrics, click “Settings” icon in the top right. Unselect anything under the “Requires sign in:” header; this action allows the form to be submitted without signing in to Goole. Note that (obviously) only the owner of the form can see the responses; this setting just means that anyone can see the form and give responses (don’t worry, only people who have the link can do this, so if you don’t share the link, nobody can post fake metrics to your system).
- Close the “Settings” box, and click the “Send” button in the right top. Click the link tab (second tab) on the “Send via” line. Here you’ll find a link to the form.
- Paste this link into a privacy-window of your browser (open one with cmd-shift-N on Mac, of ctrl-shift-N on Windows), and you should see the form.
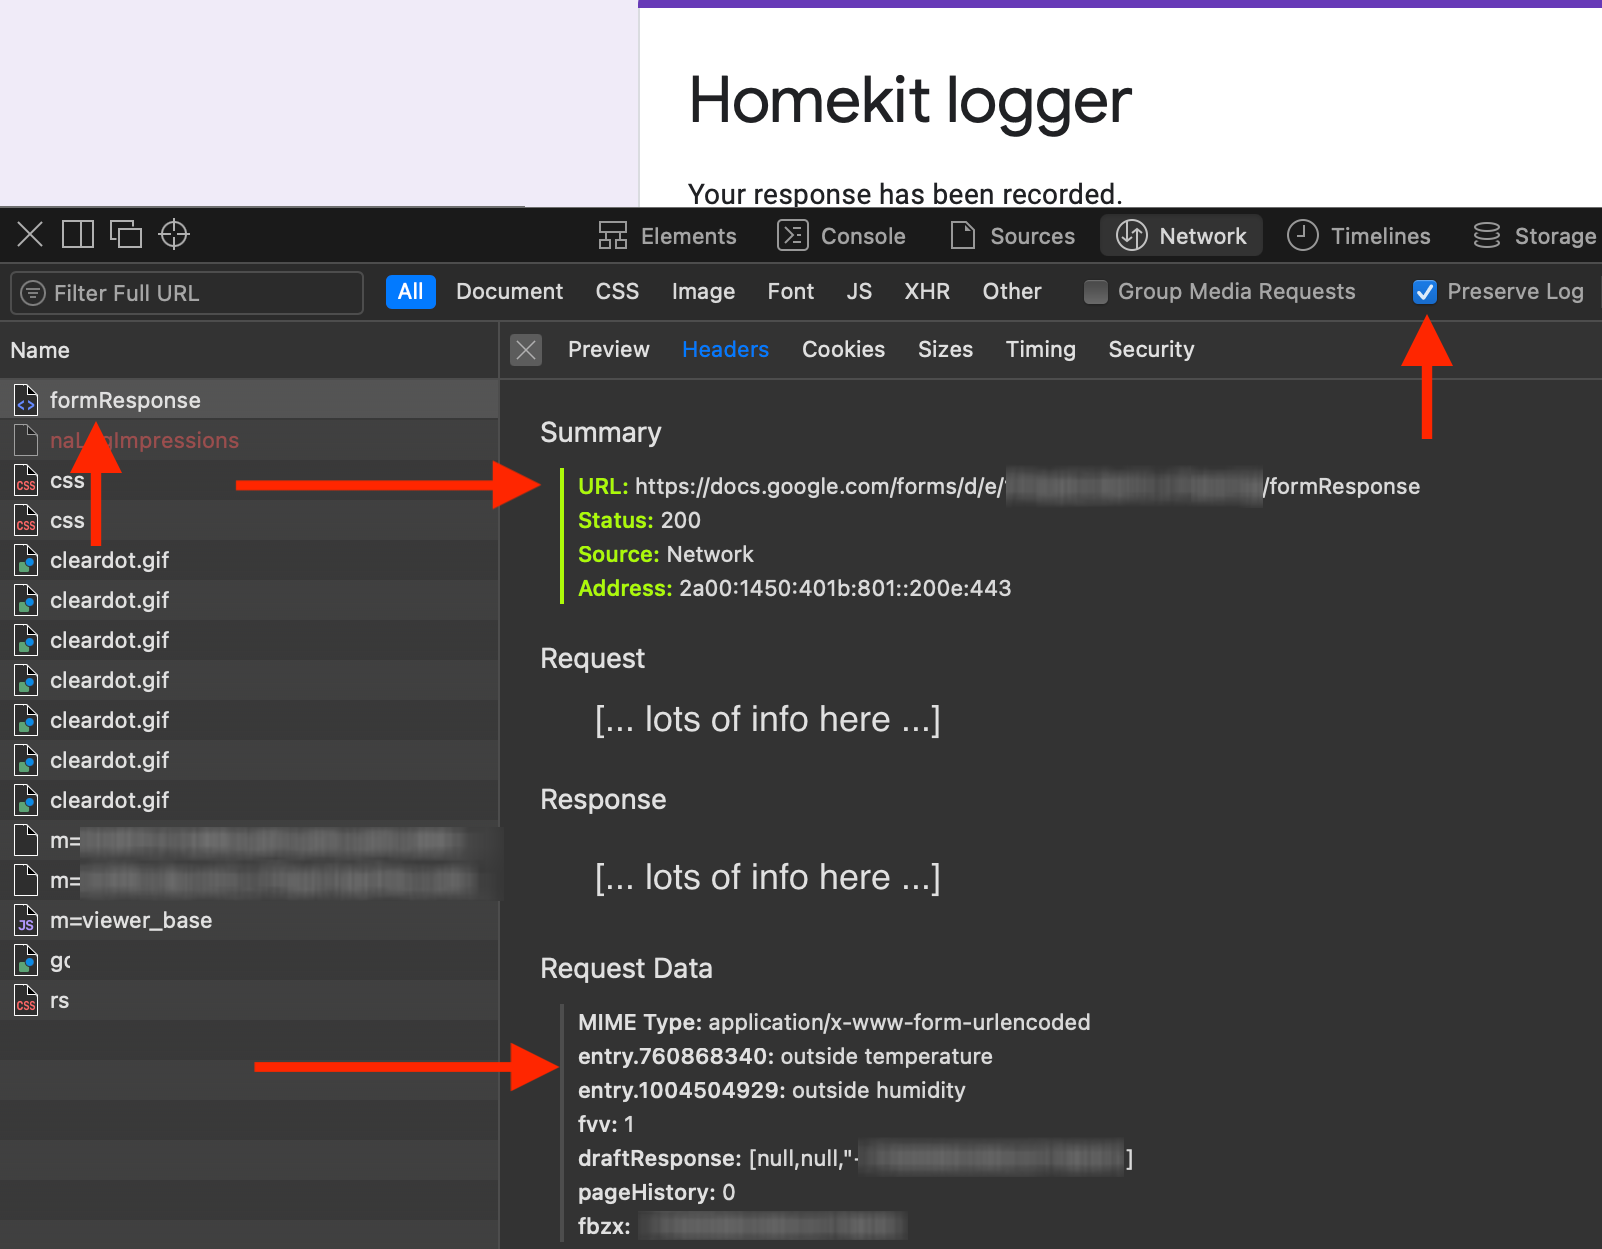
- Now the most difficult step: we need to find out what names Google gave to the different fields. In order to do so, we need to open the developer console in the browser (see here for info on how to do that), go to the “Network” tab and switch on “Preserve log” (see screenshot below). Now fill in the form, filling in the name of the metric in each field (so in the “outside temperature” field you fill in the value “outside temperature”).
- Click “Submit”. The first line in the “Network” tab of the developer console should be to
formResponse. Click on it, and on the tab “Headers”.- First of all we need the URL, which is all the way at the top (it looks something like
https://docs.google.com/forms/d/e/1HjIGQqSdwTu-X83y_XXxxxxXXXXxxxxxXXXXX-xXXxxxXXXxxxXX/formResponse). Copy and save this for later use. - Secondly we’re interested in the block at the bottom (you may need to scroll), called “Request Data”. For me it looks like this.
From this, we can surmise that the “outside temperature” field name is
entry.760868340, and the outside humidity isentry.1004504929. Make a list of the names for all fields, we will need this later.
- First of all we need the URL, which is all the way at the top (it looks something like
- Now go back to the window where you created your Google Form (or open the Google Form again from here). Click the “Responses” tab, and then the button on the top right that looks like a white cross on the green background. This button allows you to connect the form to a new Google Sheet, or connect it to an existing sheet. Choose either option, and you should see a sheet, with the data that you just filled in.
- Finally we may want to test the form post (this is optional, but it’s good to test if everything works). Go to the terminal on macOS, and type the following command:
curl https://docs.google.com/forms/d/e/1HjIGQqSdwTu-X83y_XXxxxxXXXXxxxxxXXXXX-xXXxxxXXXxxxXX/formResponse -F 'entry.760868340=field1' -F 'entry.1004504929=field2'
Make sure to use the URL and the field names that you found 2 steps back.
Add as many -F 'entry.XXXXX=fieldY as you have fields.
This command will pretend to be a browser and submit the form with the values you provide.
Lo and behold: the moment you press “enter”, your terminal will submit the form, and your see the HTML/javscript code on your page for the “Thank you for your submission”-page.
If you check now in the Google Sheet that collects your responses, you should see a line with “field1”, “field2”, etc in there (it may take a couple of seconds).
This means that your Google Sheet is ready to receive data!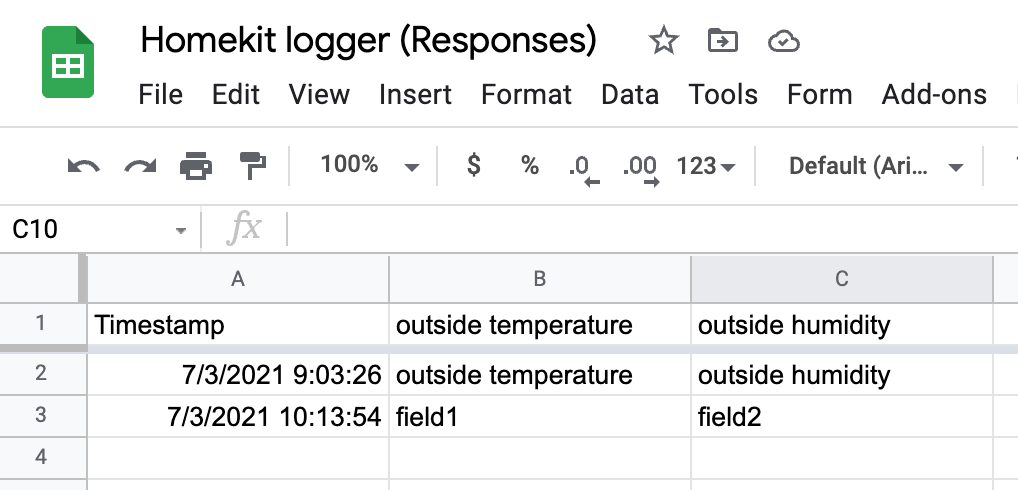
Create a HomeKit (home hub) Shortcut that posts your HomeKit data on a regular interval
Ideally we would now make something that posts the data, test if this little program works, and then schedule it. Unfortunately, there are some restrictions (at least in iOS14) that make this impossible, so we have to hussle things around a bit – we will first schedule something, and then adapt it to do what we want.
In this section we will:
- Create a trigger in the Eve app
- Edit this trigger in the Home app to execute a Shortcut
- Create (program) a Shortcut that gets the data and logs it to our Google Sheet
- Test the Shortcut manually
- Reschedule the shortcut to run automatically
The easiest way is to do this on an iOS device (I tested with iOS14). Even though the mac has a home app, there is a bug there that prevents it from working properly. You will need the URL and field names from the Google Sheet that we discovered above on your iOS device, either through shared clipboard (copy on mac, paste on iOS device), or some other way (e.g. create a note with them and share with your iOS device).
Create the trigger
Creating triggers (timers) on the iOS14 Home App is possible, however you can only have them repeat once a day at most. Since we would like to log our data more often, we need to create the trigger using a third party app (Eve).
- Download the Eve app for free.
- In the Eve app, go to the “Timers” tab and click “Add Timer”.
- For now create a timer that repeats once a day, first execution in 1 hour.

Screenshot of creating timer in Eve - Click “Next”; now choose a random scene. We will exchange a Shortcut for this scene soon, but this is not possible yet, so any scene will do.
- Click “Next” and give the timer a name, e.g. “LogTrigger”
- Click “Done”. Your timer is created.
Update the trigger, and create a shortcut to run
- Open the Home app on your device. Click the automations tab on the left (iPad) or bottom (iPhone), and then click the automation you just created in the Eve app.
- Click the “Select Accessoires and Scenes…” button.
- Important! Make sure to unselect the scene you added to the trigger in the Eve app. We’ll be adding a Shortcut in the next step, and the iOS home app has a bug that it cannot show an automation with both a scene and a Shortcut. If you forgot this, at some point the home app will just show an empty screen; in this case close the Home app, and remove the scene in the Eve app.
- Scroll all the way to the bottom and click (under Advanced) on “Convert To Shortcut”. If you’ve ever created shortcuts before, you now see a familiar screen, however with a lot less options than when creating a shortcut on your phone. The reason is that this shortcut will run on your home hub, a place without a UI, without a file system, without any apps the shortcut can depend on. There are fewer actions that make sense there, hence the fewer actions you can choose from for your shortcut.
- Remove the default action “Set <scene name>”
- Click “Add Action”
- From the suggestions, click “Get the state of <Home>”
- Now in the action, click “Accessory State” and select the first metric you want to log.
- Keep adding entries for additional metrics. If you have to add a metric with a name you already had before (e.g. both indoor and outdoor temperature will use variable name “Current temperature” by default), you can use “Set Variable” from the Scripting menu; if all your metrics have unique names, you don’t have to worry about this.
- Once all the metrics have been retrieved, we add “Get Contents of URL” from the “Web” menu.
- For the URL, fill in the post URL of the Google Form (the
https://docs.google.com/forms/d/e/1HjIGQqSdwTu-X83y_XXxxxxXXXXxxxxxXXXXX-xXXxxxXXXxxxXX/formResponse). Note that if you try to post to something else than Google Form, make sure it’s an HTTPS address with a valid certificate; in my tests, posts to HTTP (non HTTPS) addresses worked fine during test, but not as part of the automatic timer. - Click “Show More”
- For “Method” choose “POST”
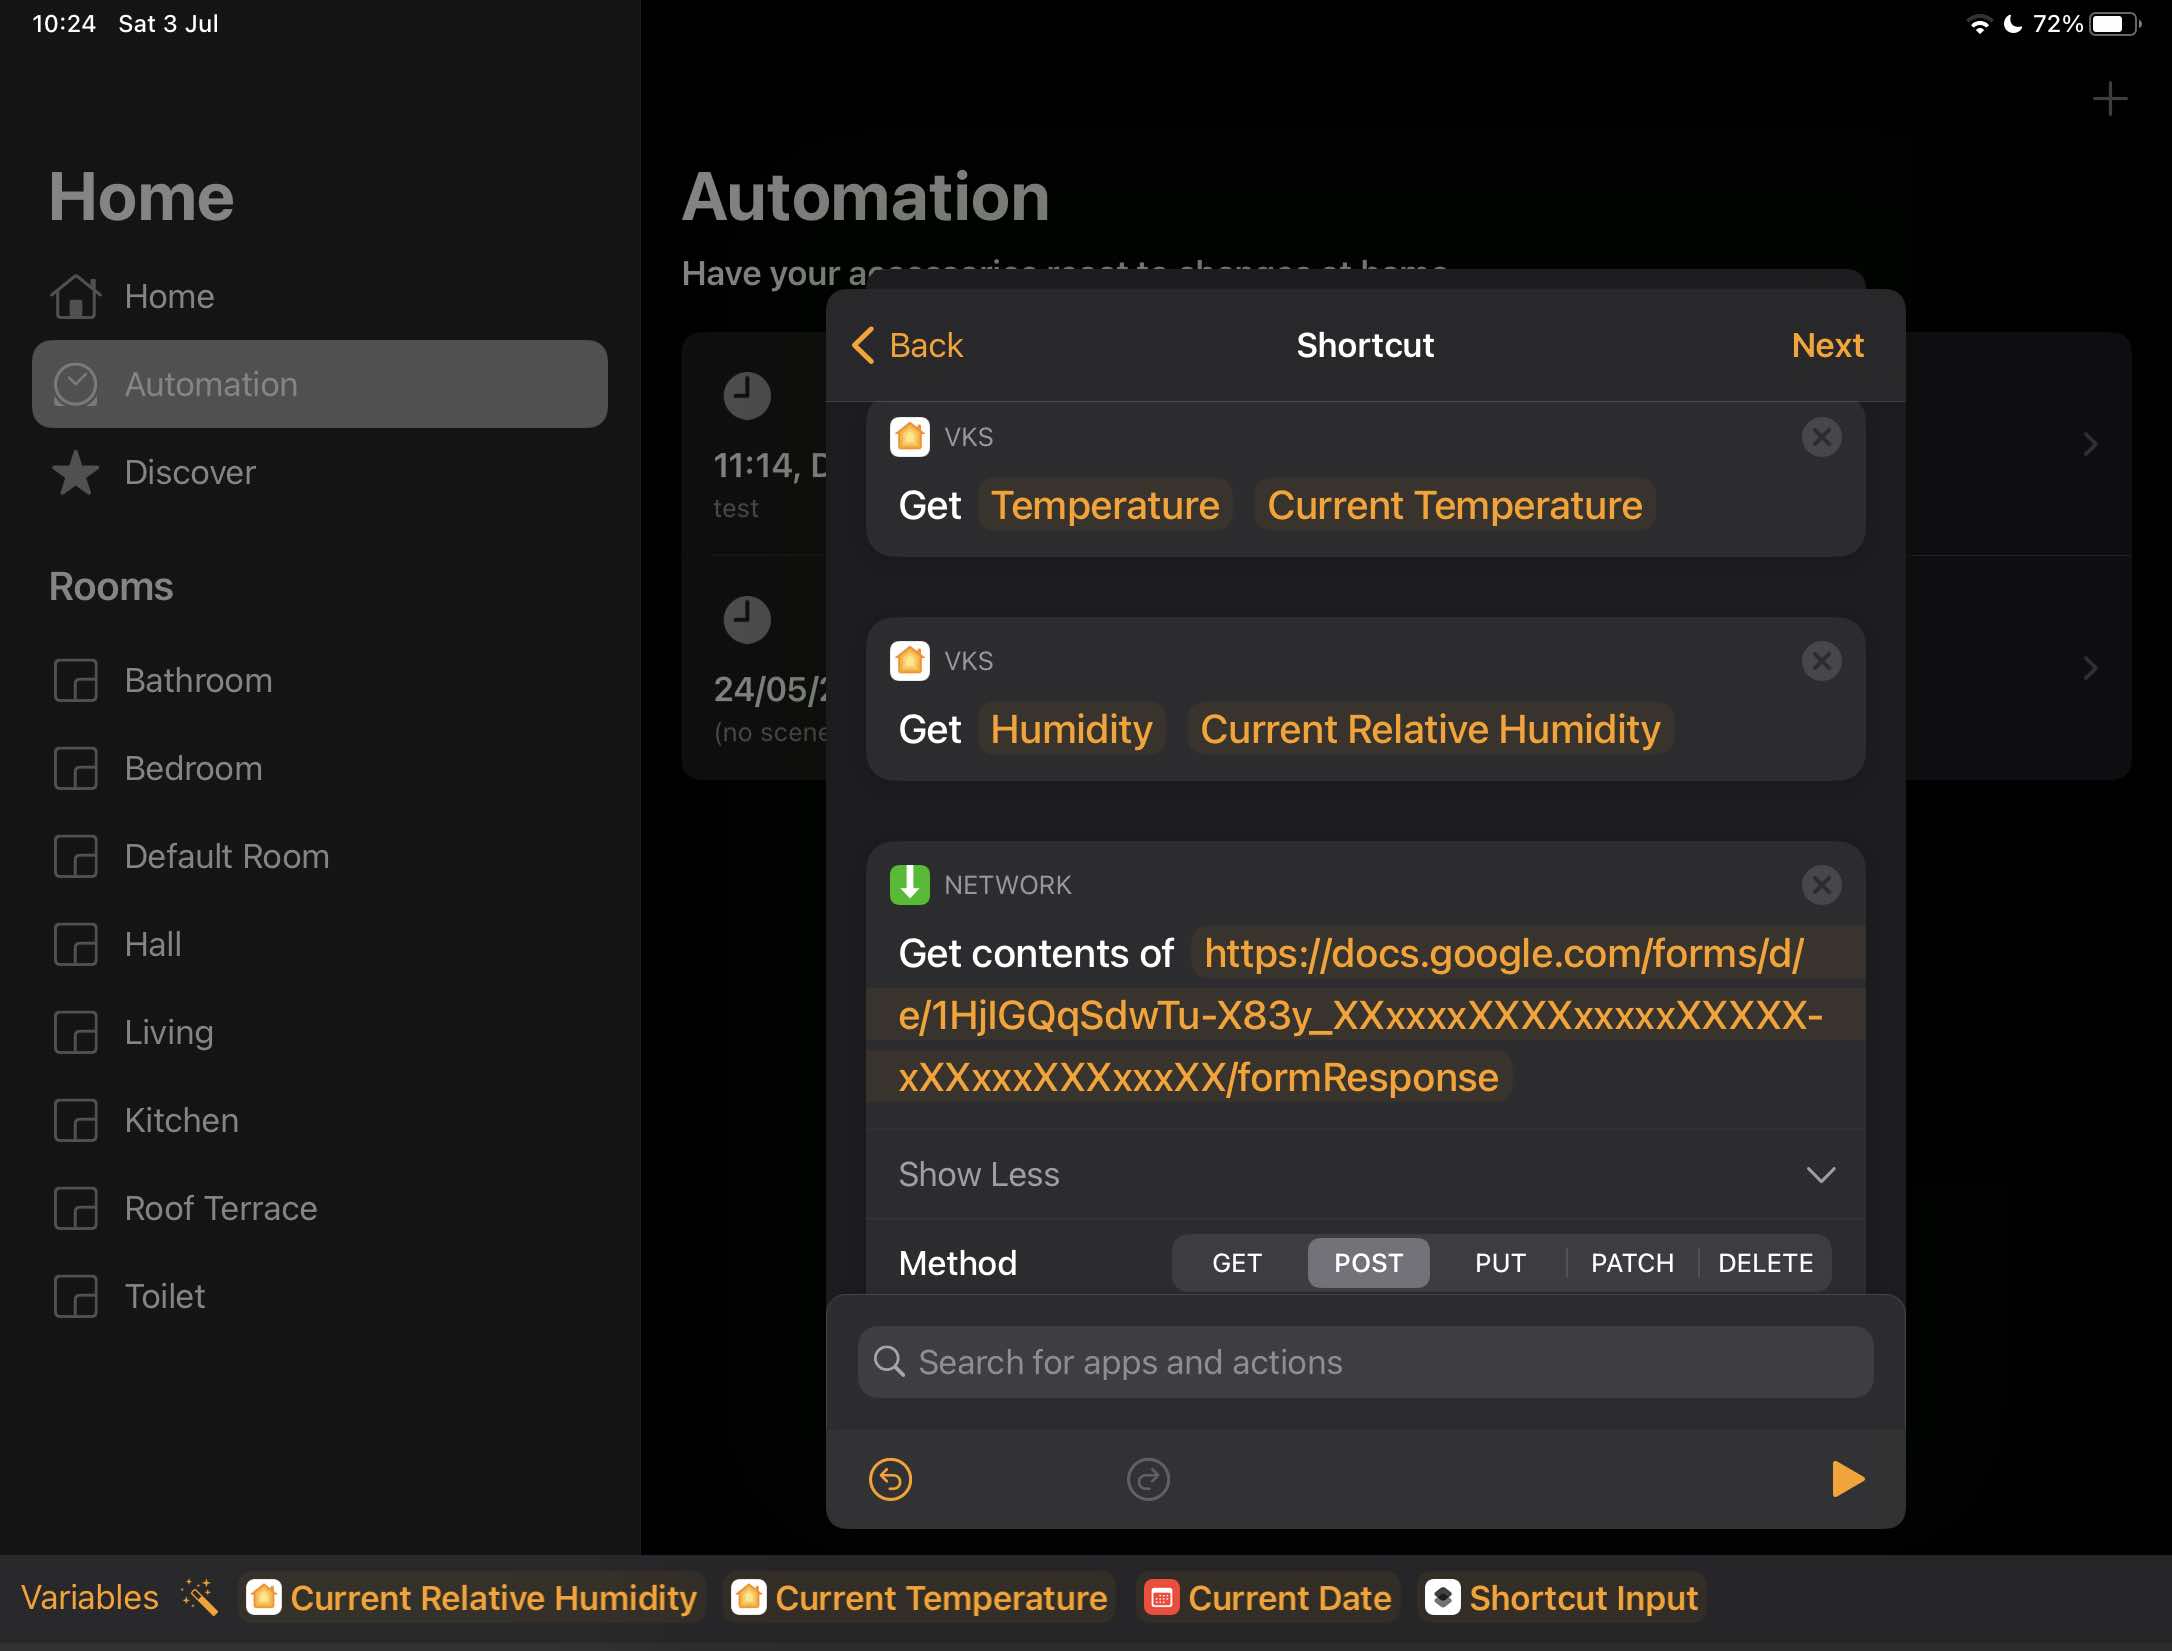
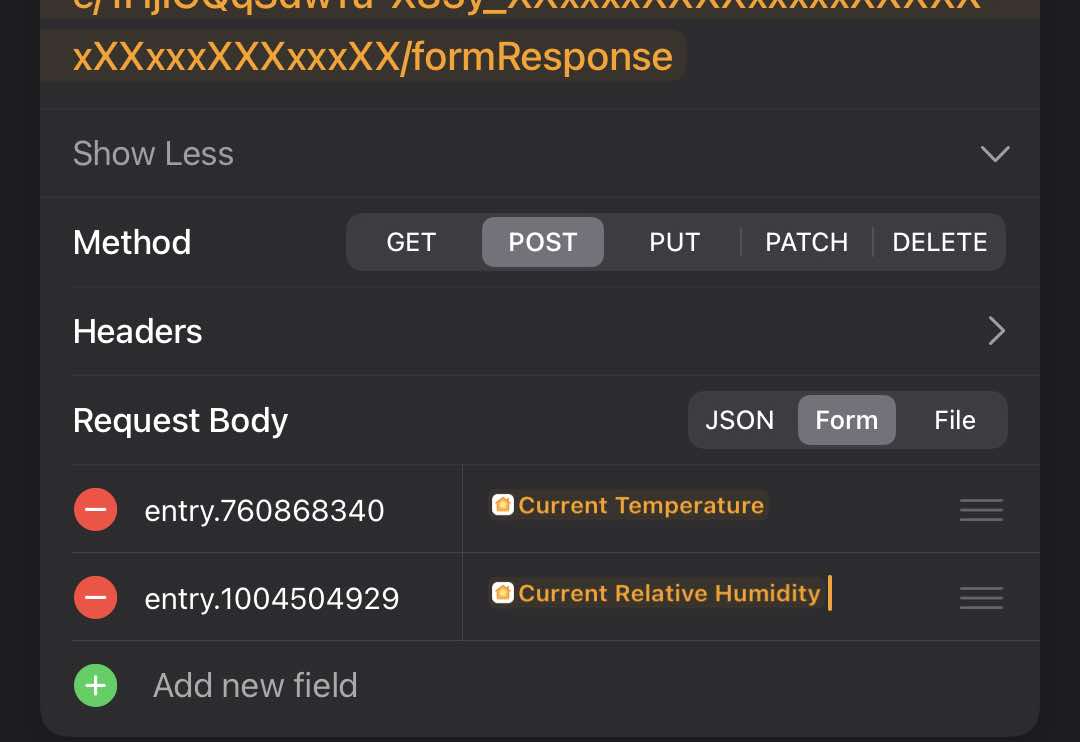
Screenshot of creating shortcut - For “Request Body” choose “Form”
- Click “Add new field”, type “Text”. For Key use the field name that we discovered in the form before (in my case:
entry.760868340for outside temperature), and Text choose the variable name (“outdoor temperature” in my case). If you decided to ignore my warnings and do these steps in the Home app on the mac (at least on Big Sur), you’re now stuck, because as far as I know there is no way to select a variable now. If so, just save the shortcut and open it on an iOS device, where you can add the correct variable. - Repeat the previous step for all fields/metrics.
Screenshot of creating shortcut
- For the URL, fill in the post URL of the Google Form (the
- Test the shortcut by clicking the “play” button in the right bottom. If everything went right, you should see data appear in your Google Sheet! Note: sometimes this gives an error on my iOS device “A server with the specified hostname could not be found”, even though the URL is correct. Interestingly in this case, if you click “Next” and then “Test this automation”, it works after all – the data appears in the Google Sheet.
Reschedule the trigger to run automatically
If we can manually run the automation and the data gets logged to our satisfaction, it’s time to update the trigger so that it runs automatically.
- Open the Eve app again
- Go to Automation and select the Timers tab
- Click the LogTrigger timer.
- Click on “Repeat” and select the repeat schedule you want. There seems to be a lower limit at repeating every 5 minuts.
- Click on “Start at” and select a time in the near future – however not too near. As rule of thumb, choose a moment that is more than 1 minute away (to allow all syncing via iCloud to finish), and on a 5 minute boundary.
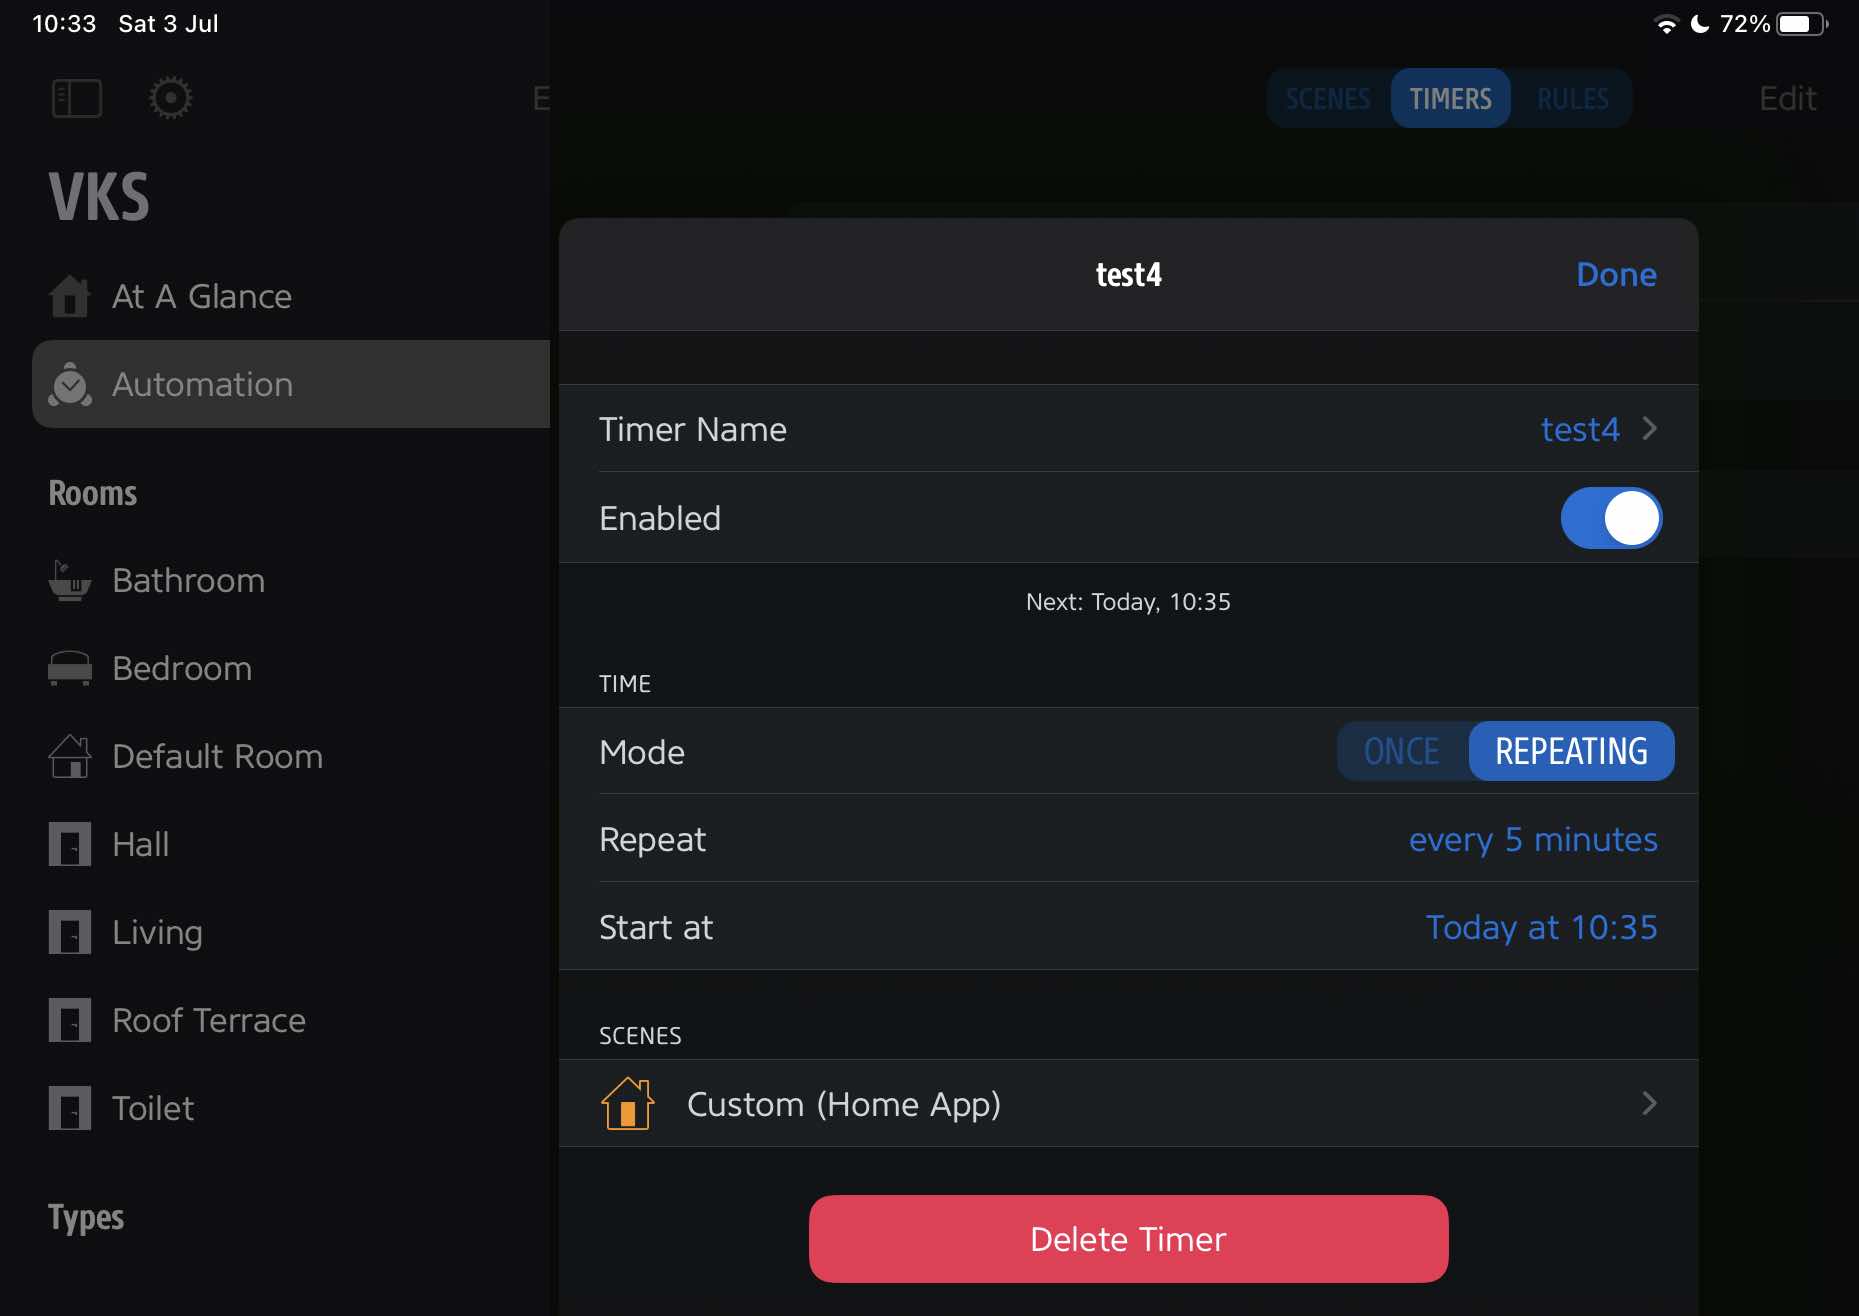
Screenshot of fixing the timer - Click “Done”, walk to the fridge (slowly), get yourself a beer, and when you come back check if the 5 minute mark has passed. If so, you should see new data in your Google Sheet.
Closing remarks; quirks & tips
- I have this setup working stably at my house for a couple of months. As far as I can see, I get a steady stream of data every 5 minutes (with the exception of when the internet or power in the house is down).
- Having said this, it feels that doing the above really reaches the edge of what is supported. For instance, the Home app only knows daily repeats, and creating a 5 minute repeat trigger just shows up as a one-time trigger in the home app. It still works though.
- A consequence of this “edge of supported” seems to be that if you change anything in your Shortcut, you need to open the Eve app again, and schedule a new start-time in the future, or the Shortcut will not run.
- It would be a whole lot easier if there was some way to copy-paste Shortcuts, so that for instance you could first make a shortcut, and only then decide on an automation and paste in your Shortcut (or select it from a list). This is not how it works however.
- Even though you can edit the response Google Sheet (change rows, remove rows), I would advise restraint. It seems that Google Forms just adds new data in the spot where it thinks it should go (i.e. response nr 15 will always be written to row 16, no matter what is there). Personally I am comfortable with removing measurements that were just tests or should not be there – these will remain empty lines forever.
- If at some time in the future you want to add new fields to log, just add new questions to your form, find the names of these new fields, and add them to your shortcut. It should just work. (not sure what happens if you delete questions (or rename them…)
- A Google Sheet has a max capacity of 5 million cells. Assume that we log 50 items every 5 minutes, than would be about 5 million datapoints per year (so 1 Google Sheet would last for about a year of data). Not a fully scalable solution, but in a year time it should be easy to switch to a new sheet. Or: only log the top 10 items, and buy yourself 5 year.
- In the current setup, the Google Sheet logs exactly what the sensor outputs.
This means, for instance, that I have things like
18.4 °Cin the sheet; in order to plot it in a graph, or do anything with it, I need just the18.4. It is possible to add extra code to the Shortcut to remove the°C, but it’s much easier to do this later in the sheet. - I use the second sheet (second tab) in my Google Sheets to “Fix” the data from the first. Note that this effectively halves the number of measurements that the sheet can store. For instance, to covert the temperature column into something I can plot, I use the following formula (is overkill; converting all measurements into Celcius, in case my devices decide to measure in Fahrenheit for a while)
=IF(
  REGEXMATCH('Form Responses 1'!B2, "°C$"),
  LEFT('Form Responses 1'!B2, LEN('Form Responses 1'!B2) - 2) + 0,
  IF(
    REGEXMATCH('Form Responses 1'!B2, "°F$"),
    LEFT('Form Responses 1'!B2, LEN('Form Responses 1'!B2) - 2) / 1.8 - 32,
    ""))
- In the back of my mind, I am thinking about a small project to make logging of this data a lot easier, without Google Sheets, without limitations, and with nice visualisations. Follow this blog to stay informed!
<figure-child>
  <figure>
    <img alt="record measurement as a number" src="measurement-as-number.png">

  </figure>
</figure-child>
I ran into the “values as text in the sheet” issue myself, but i noticed something you can do about it in the shortcut itself, without adding extra steps. In the form’s Request body, where you specify the fields and values, if you tap the selected variable (i.e. where it says “Current Temperature”, you will get a configuration sheet for that value. The type is specified as “Measurement” by default. When you change the value to “Number” this will send the value as a number into the Google Sheet.
For Dutch users, don’t forget to set the Sheet’s document locale to Netherlands, so that understands that a comma is a decimal separator instead of a thousands-separator :)
Troubleshooting
- Check the description above, some steps have troubleshooting remarks in cursive.
- If you somehow got lost and don’t know how to get back: in the Eve app you can always delete the trigger, which will delete the shortcut as well. Then you can start again from the top.
- If a new rows appear in the Google Sheet but some fields don’t seem to populate, probably there is a problem with the name of the field in the shortcut. Make sure there is no space before/after the name, or something like that. It’s of course also possible that the sensor doesn’t give a value; you can check this by posting a hardcoded value to the field in the shortcut (rather than the variable).
- Unfortunately there are not many options for debugging a HomeKit Shortcut. If the execution halts, you can see so when you press the “play” button on the Shortcut edit page. Also, running the code on the shortcut edit page will show you a miniature webpage that was retrieved; sometimes with a lot of effort you can read something in there.
- If no rows appear in the Google Sheet, make sure that you have the correct URL and the the method is POST. Even a post without any fields should at least produce an a new line in the Google Sheet with just the date and time.
- Sometimes things go wrong during syncing from and to iCloud, especially if multiple devices are making changes at the same time. If this happened, probably best to delete the automation and start again, this time on only 1 device.
- If you notice scenes being activated in your house, it may pay off to check in the Eve app if the automation doesn’t accidentally still have a scene as well. If so, switch this off.
Bonus: shortcuts
Shortcuts are small programs that allow automation of stuff in the Apple landscape. They were introduced a couple of years ago on iOS, and slowly become more powerful. As you can see in this article, shortcuts for HomeKit still feel very feeble, but they do hold great promise. Using Shortcuts for homekit, one can make complex automations for the home. Since the shortcuts are essentially small programs, they can not only do simple IFTTT actions (IF the CO2 level comes above 1000 ppm, THEN open a window), but take the states of multiple sensors into account : IF the CO2 level goes above 1000, THEN check if the outside temperature is within a certain range AND if it’s not raining THEN open the window, sleep 5 minutes, THEN close the window again.
The major problem for now (in my opinion) is that these shortcuts cannot easily be copied and shared (I do see the security implications; I wouldn’t want my son to download a shortcut than does something cool, but also has a hidden feature of opening the front door and switching off all cameras if the author of the shortcut comes for a visit).
Additional problem is that it probably makes most sense to write (many) house automations as a state: WHILE CO2 > 1000 AND outside temp within <a, b> AND rain = False DO open window for max 5 minutes; meaning the window would close as soon as one of these metrics was not true anymore. With the current shortcuts, it is possible to build this, but only by making a lot of very similar shortcuts, all with different triggers, in a very non-maintainable way.
I do think that the idea of Shortcuts (or something similar) has great promise for the smart home. I should mention that there are many other products out there that do solve the issues I have with shortcuts right now, however I tend to trust Apple more with my secuirty and privacy (and making a solid product) than many of the current available options. In addition, I know that companies will continue building HomeKit support into their products, even if these other products may not be supported anymore.
(update!) Bonus2: add data from another API to the same Google Sheet
Sometimes one would like to log data from an external API also to the Google Sheet – for instance, log the reported local temperature from OpenWeatherMap (as the original question was about), but it can also be the API of a non-homekit device you have in your house. Doing this is a 3 step job:
- Retrieve the data from the API
- Parse the data and select the item you want
- Send the result to Google Sheets.
Getting the data from an external API
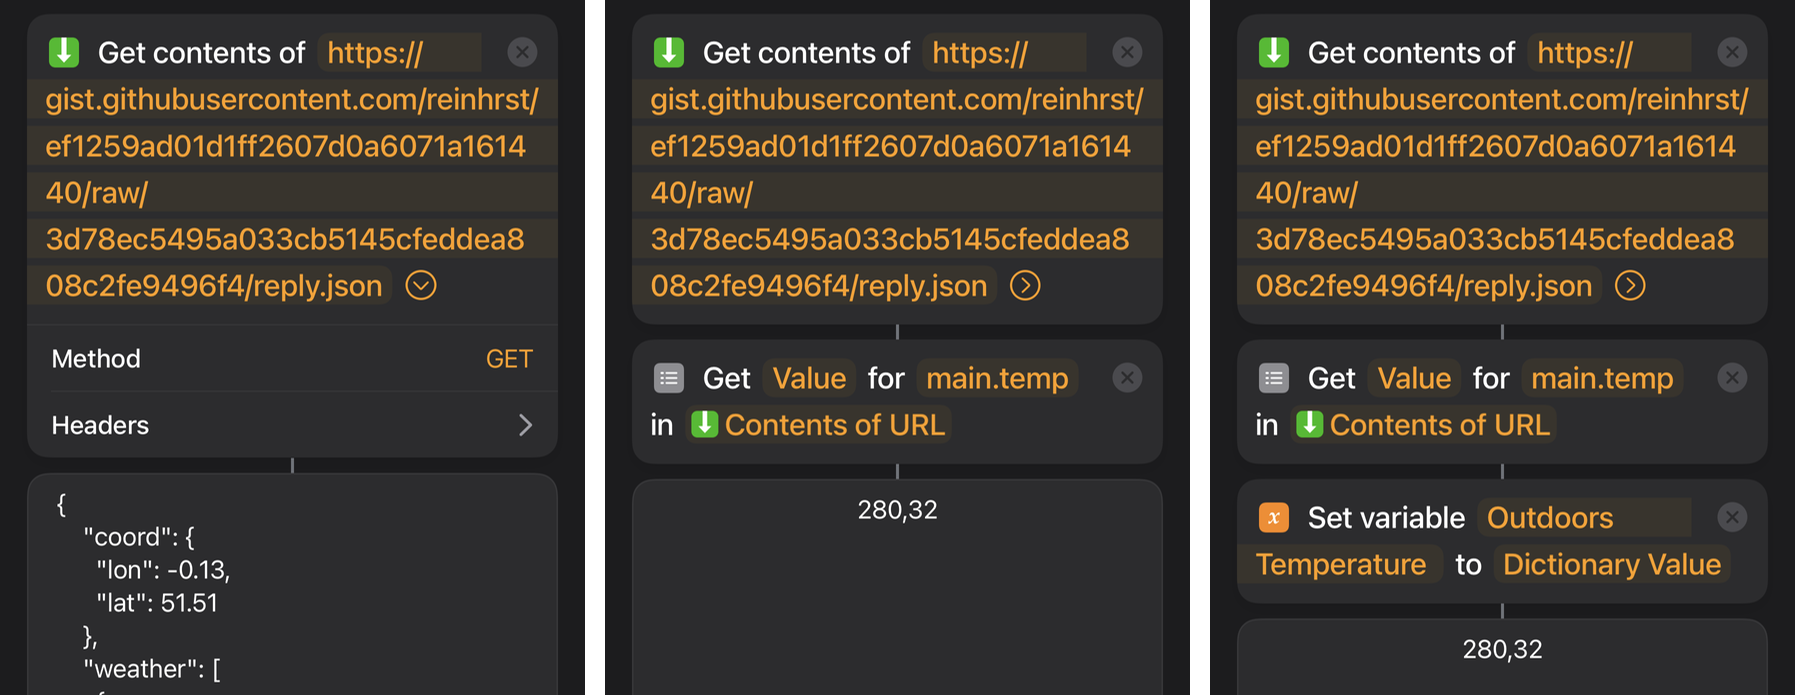
One can use the Get contents of action to get the data of a random web address.
In this example I get the data from this gist (this url for the raw data.
This is a copy of the example reply to api.openweathermap.org/data/2.5/weather?q=London&appid={API key} according to the OpenWeatherMap API documentation.
If necessary, you can add the headers or post variables by clicking the ⧁ symbol after the url in the shortcut.
The result of the Get contents of call is a JSON string, however Shortcuts magically converts this into a dictionary.
Parsing the result
Now that we have the result, we need to get to the main.temp key.
It turns out this can be done in 1 Get Dictionary Value action, just use main.temp as the key name.
Finally we save this value to a variable, which we can use later in our post to Google Sheets.
Send to Google Sheets
This step is not shown in the screenshots above, however it’s exactly the same as for HomeKit data, so see above in the post.
Just create another “question” in your Google Form and add more entry.* fields to your http call.
Risks
I have been wondering what happens if the API goes down, or gives an error (for instance because you’ve gone over your allowance this month).
In my tests it looks like if the API gives a non-200 reply, the shortcut will just continue (and the variable will be empty at the end, probably what you want).
Obvously you could build additional error-handling code around this (through use of the if action), but this is probably overkill.
If however the API goes properly down (hostname cannot be found, port is closed, request hangs, etc), the shortcut just errors (and since your HomeKit hub most likely does not have a screen, you’ll never know). This error blocks the rest of the shortcut from running, in effect also stopping the HomeKit data logging.
Whether this is an acceptable risk is up to you.